Get started
An overview of Secure Pipes, how to download, install, and setup, examples, and more.
An overview of Secure Pipes, how to download, install, and setup, examples, and more.
Relax, Secure Pipes utilizes OS X's pre-installed SSH binaries. So, it's easy to install and has been designed to try to stay out of the way of your existing SSH configuration.
SSH is an extremely versatile piece of software included with Mac OS X by default. Traditionally and most commonly, this software is used to open up terminal sessions on UNIX computers. It includes both a server and client component, and is time-tested software (read: stable and secure).
One of the core technologies of SSH is the ability to establish a secure and authenticated communication channel between a client and server. On this foundation, the authors were able to extend the capabilities of SSH far beyond just opening up terminal sessions. Secure Pipes uses one of these capabilities, SSH’s TCP port tunneling capability, to setup secure communication “pipes” that help OS X users solve a variety of network communication problems in an easy to manage way, just like you expect on a Mac.
Secure Pipes uses existing SSH binaries on your Mac and allows for some other features that might require administrative access. Therefore, the software is currently not distributed via Apple's App Store. It has been tested on Mac OS X El Capitan (10.11) up to MacOS Big Sur (11.01). Please click on the button below to download the disk image containing the software:
Currently v0.99.11
Once you downloaded the disk image, double-click on it to mount it. You'll then see a Finder window with the Secure Pipes application and an alias to the Applications folder. Drag the application icon into the Applications folder alias to install it into the Applications folder. Open the Applications folder and double-click on the Secure Pipes application icon to start it. Your only indication that the program is running is the cloud icon in the menu bar.
Starting with OS X Lion, Apple introduced Gatekeeper to provide additional security when installing software on your Mac. If you get the above message, see the Apple documentation on configuring Gatekeeper to allow installation of software not downloaded from the App Store.
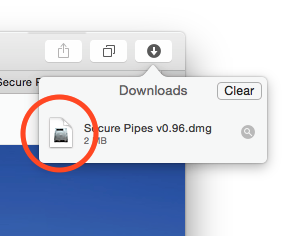
Double-click on the disk image to mount
To remove Secure Pipes from your system, simply drag the application from the Applications folder into the trash. To make sure no passwords are left on the MacOS keychain, it is strongly recommended to delete all connections before removing the application. Secure Pipes does keep some settings and other info in your ~/Library folder. These are harmless to keep around (and will keep the app configuration if you choose to re-install later), but for those of you who prefer keeping your system in pristine condition, please remove the following:
Besides the software you download here, you will also need at least one server as the endpoint for your pipes.
Although Secure Pipes can be used in a local network environment, the real power of tunneling technology is best used in combination with a server (running SSH) connected directly to the Internet with a routable IP. The best option for this is to setup a cloud server, which can be done in a matter of minutes from a variety of cloud hosting providers, armed with either a credit card or Paypal account. If you’re just kicking the tires and want something quick that can still offer outstanding reliability on a pay as you go basis, you can’t go wrong by getting a server with Digital Ocean for $5/month. Their Linux servers come with absolutely no bloat and out of the box are running the only application you need for Secure Pipes: SSH.
If you're really kicking the tires, just go ahead and enable SSH access on your Mac and use your local machine as the client and server.
Please refer to the SSH Configuration section for more details on configuring your SSH server best for the functionality you need.
There are three types of tunnels Secure Pipes can setup and manage: Remote Forwards, Local Forwards, and SOCKS Proxies.
Secure Pipes runs as a menu bar application, and the icon for the app will be in one of four states at any given time while the program is running:

No Connections Active

Single Connection Active

Multiple Connections Active

Making Connection (Animated)
Select the cloud icon and choose "Preferences..." from the menu to show the configuration window. Here you can setup your various tunnel connections and also change some general application settings. The application settings under the General tab are pretty much self-explanatory, but here is a quick overview:
The main problem solved by remote forwards is illustrated in the accompanying diagram. Basically, for some reason a TCP/IP service (in this case port 25) of machine A on the Local Network is inaccessible directly from the Client on the Internet (or some other network), and we want to make it accessible. The reasons might be that there is a firewall in between, the public IP address of the local network is dynamic, the traffic is filtered by some service provider along the route, the client is using IPv6 and the local network is IPv4, etc. Traffic from the Local Network, however, is allowed essentially unfettered access to the Internet (well, at least enough access for an SSH connection). Remote Forwards solve this problem by having a machine (running Secure Pipes) placed in the Local Network make an SSH connection to a server on the Internet (your cloud SSH server) and have these two machines broker all the traffic between the Client and machine A. These tunnels are called Remote Forwards because from the perspective of the Local Network where Secure Pipes is running, remote (Internet) traffic is being forwarded securely to the Local Network.
Okay, that's great, but I just added two additional machines to my infrastructure for something I could easily have done with port forwarding on my router, right? Well, sort of. First, Secure Pipes can run on the same machine as the service, so a separate B machine is not needed. In my case, for example, I run Mac OS X server and Secure Pipes is running on that same machine. In fact, if your services are running all on Macs, you can just run separate copies of Secure Pipes on each Mac instead of having an intermediate Mac (B) forward requests to machine A. Secondly, many service providers don't allow customers to run servers or even traffic on port 25, so you need the C machine to provide that accessibility. Thirdly, I enjoy the convenience of having the machine running the service in control of how traffic gets to it, and I can turn it on/off as needed or even re-assign it to a different IP by using a different SSH server. Fourthly, the geo location of your service's endpoint is not easily determinable, and your privacy is protected. As far as you know, mail.opoet.com is running on a server in New York City, but in reality it might be on a Mac Mini sitting in an office in California or my laptop at a Starbucks in Hong Kong. Finally, it doesn't matter much since SMTP traffic is usually sent in plain text and your local network is assumed to be secure, but the tunnel is encrypted, so traffic from machine C to machine B is encrypted.
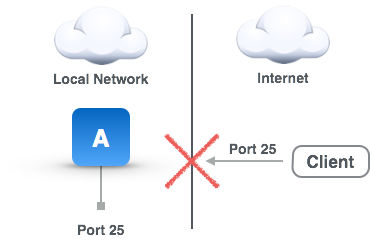
Remote Forward Problem
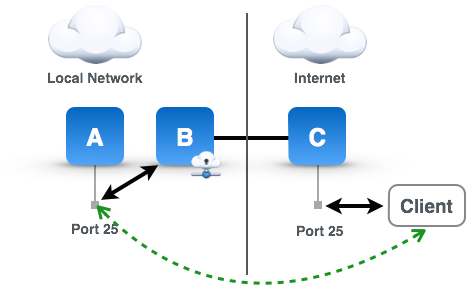
Remote Forward Problem Solved
Now that you understand what's going on in a remote forward, setting up the connection in Secure Pipes is quite straightforward, with only a few small details to consider. From the Preferences window Connections tab, click on the "+" sign to add a "New Remote Forward..." connection, and you're presented with a form to specify the information needed to setup the connection.
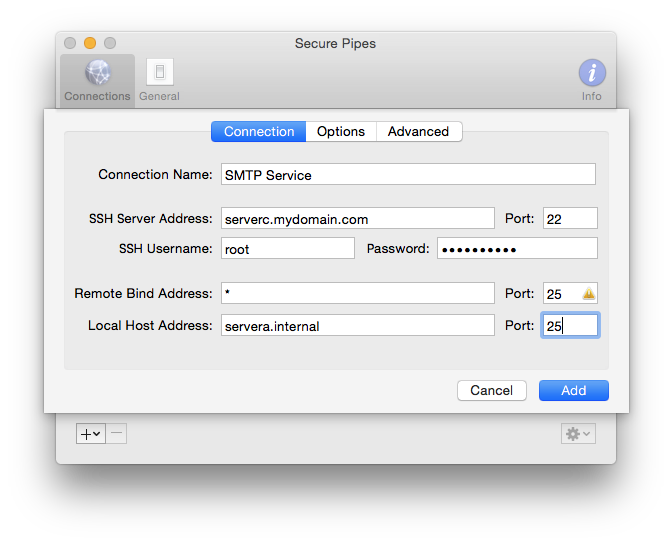
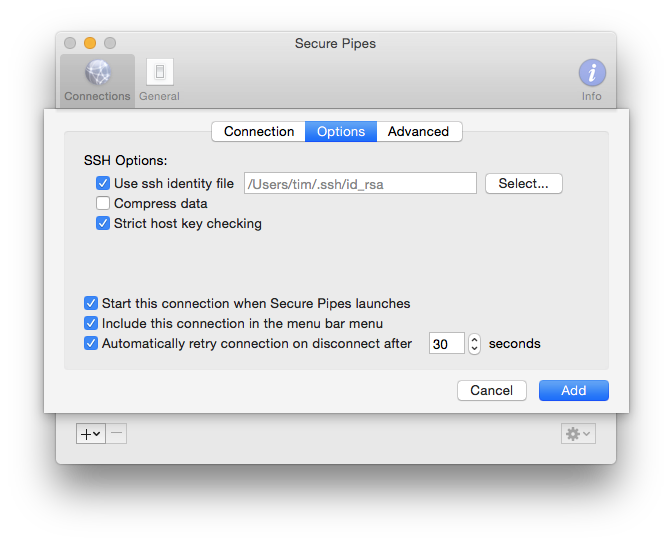
GatewayPorts clientspecified (which is not the default) to allow binding to "*", which indicates all interfaces. Without this option, the forwarded port will only be available on "localhost" (the internal loopback interface), and the service will not be available to remote hosts.There are some additional options that can be configured under the Options tab:
The Local Forward problem is similar to the Remote Forward, except it deals with the case where the client inside a local network cannot connect to a certain TCP port on a server in another network (usually the Internet). This is quite common especially for port 25 where service providers will block direct connections to port 25 to control spam, and can be useful in other applications like getting access to IPv4 services from a local IPv6 network. In this use scenario, the machine on the local network running Secure Pipes (machine B) makes a secure connection via SSH to some server C on the Internet. Machine B will then bind to a designated port (in this case port 25) and forward all requests for that port to machine C which will in turn forward the request to machine A. Again, similar to the Remote Forward, machine C doesn't need to be a separate machine from machine A. This type of tunnel is called a Local Forward, because from the local network's perspective where Secure Pipes is running, local traffic is being forwarded securely to the remote network (Internet).
Local Forwards can also enable a "per service VPN" of sorts in certain configurations. For example, suppose there is a second local/private network that has an open port for SSH connections to a server on that network. Using this, you could securely tunnel a service and provide directory service access using an LDAP server on that network. Or, when combined with a Remote Forward, you can even avoid the need for an open port for SSH connections. I use this type of configuration for enabling secure remote screen sharing for Macs on my home network in lieu of setting up a VPN.
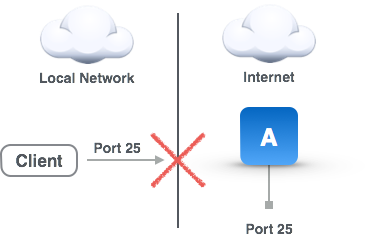
Local Forward Problem
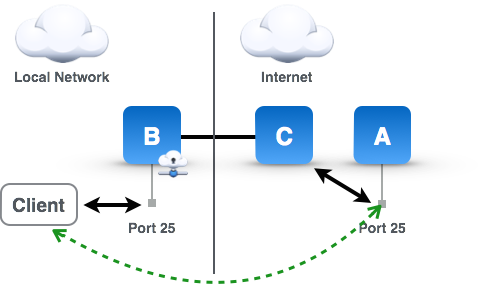
Local Forward Problem Solved
Setting up Local Forward connections in Secure Pipes is almost identical to Remote Forward Connections. From the Preferences window Connections tab, click on the "+" sign to add a "New Local Forward..." connection, and you're presented with a form to specify the information needed to setup the connection.
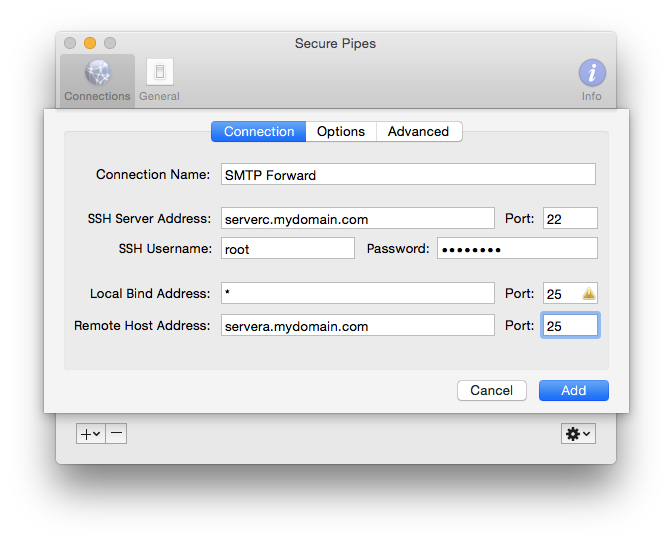
Additional options under the Options tab have the identical functionality as described for Remote Forwards above.
The SOCKS Proxy problem is similar to the Local Forward problem where a client on a network is unable to reach a service on another network, like a web service on port 80 (see accompanying diagram). Typically this is due to local network administrative policy, service provider policy, or sometimes local country network policy like The Great Firewall in China (check out this tool). The way to solve this problem is to have an SSH server (server C) in a network without the local network restrictions make the requests for you and broker the traffic back and forth. In the accompanying diagram, machine B is running Secure Pipes with the proxy listening on port 8080. It will forward requests through the encrypted SSH tunnel to the SSH server C which will then make the request to the destination server A, and return the result back through the encrypted channel. Using a SOCKS proxy means that local application need to be configured to use a it. For most Mac OS X client applications such as web browsers and mail clients, this is centrally configured in the system Network Preferences. This type of tunnel is called a SOCKS proxy, because it proxies requests for another machine and uses a protocol called SOCKS to communicate with the local application to achieve this.
Since SOCKS proxies make requests on behalf of other machines, they also bring the benefit of anonymizing communication. For example, if you are in Europe, but using a proxy server based in New York City, services that identify you by your IP will only see the IP of the SSH server. Only unless they somehow have access to your SSH server or maybe the network around it, will someone be able to determine your real location. This is useful in things like digital currency transactions or even some online streaming or music services that require you to be in a certain locale. Another convenient feature of SOCKS proxies is the data compression option that can help reduce traffic volume and lower costs when using a cellular hotspot device.
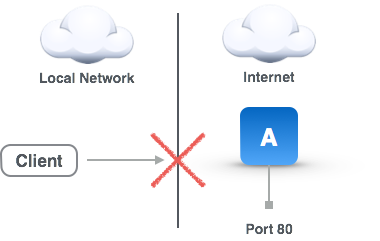
SOCKS Proxy Problem
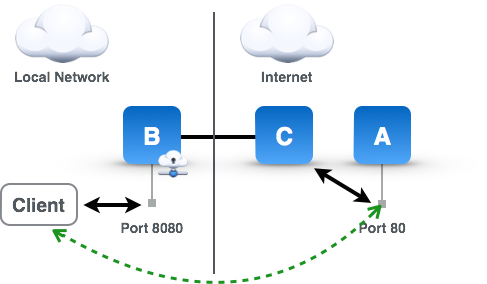
SOCKS Proxy Problem Solved
Setting up a SOCKS Proxy in Secure Pipes is almost identical to Local Forward Connections. From the Preferences window Connections tab, click on the "+" sign to add a "New SOCKS Proxy..." connection, and you're presented with a form to specify the information needed to setup the connection.
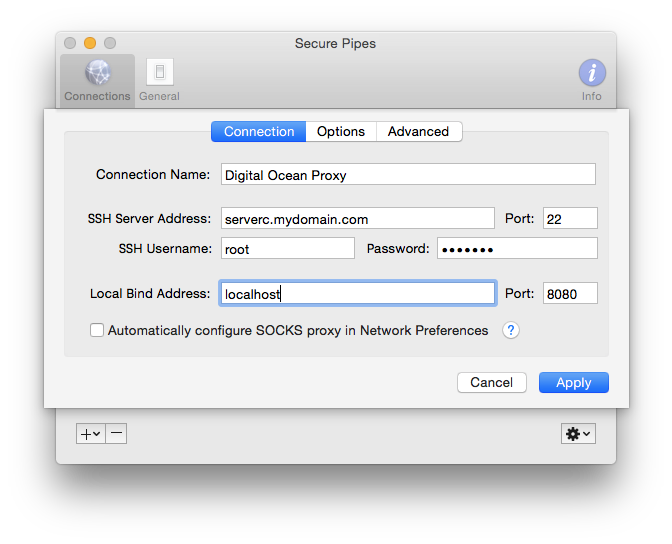
Additional options under the Options tab have the identical functionality as described for Remote and Local Forwards above.
Once a proxy is setup, applications need to know to use it. This is achieved by opening Network Preferences, selecting the currently active network connection on the left, click on the "Advanced..." button, and then "Proxies" tab. Check the "SOCKS Proxy" item in the list of proxies, and then fill out the server name and port specified above. Go to a site like http://www.whatsmyip.org to verify that the proxy is working.
Alternatively, you can choose to have the software configure the SOCKS proxy automatically for you when the SSH connection is made. This is much easier than having to navigate to the Network Preferences every time you want to use a proxy. To enable this feature, click the "Automatically configure SOCKS proxy in Network Preferences" option on the "Connection" tab (see screenshot below). When the SSH server is disconnected, the settings for the SOCKS proxy will return to what they were before the connection was made. This feature requires the administrative password for the software to be able to change the Network Preferences. You will be prompted to enter the password when the connection starts, or chose to save the administrator's password so that you aren't constantly prompted (recommended). Note to save the administrator's password in the Mac's keychain, you must enable the "Allow saving administrative password in keychain" in under the Secure Pipe's General preferences.
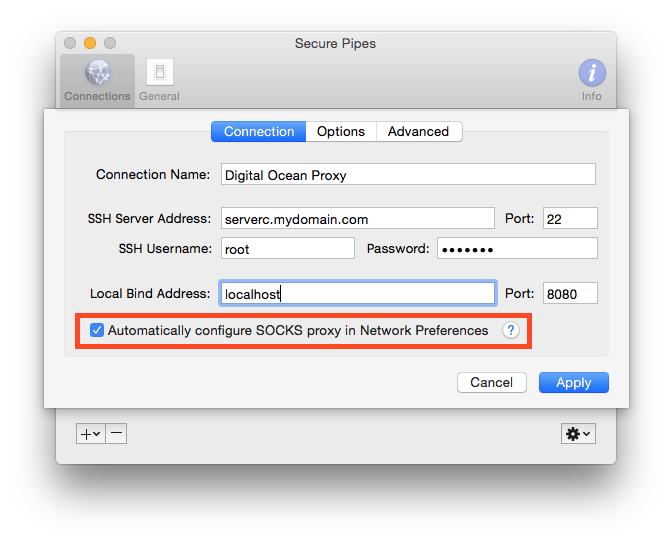
There is some configuration of the SSH server (usually configured in /etc/sshd_config or /etc/ssh/sshd_config that may be required in order for certain functionality of Secure Pipes to work. Here are some things to look out for in case the functionality is not working as described:
GatewayPorts clientspecified - for Remote Forwards, if this is configured as GatewayPorts no, only the loopback interface (machine internal) will have access to the forward. If configured GatewayPorts yes it is possible that the forward is available on all interfaces, which sometimes is not desired for security reasons.
PermitRootLogin yes - for Remote Forwards, make sure this is set so that the server can bind to ports less than 1024 and also make sure the specified user has root privileges.
ClientAliveInterval 10 - if you prefer to know sooner than later if an SSH connection has gone down, you can change this setting to a low number like 10 seconds. This configuration will send "keep alive" messages every 10 seconds to make sure that the connection is still active and if no response, the server will close the connection.
Additionally, here is good article on configuring a user on an Ubuntu system for port forwarding only.